How to Create a Child theme in WordPress
Creating a child theme in WordPress only takes a few steps. Below we’ll cover each one in depth so you can follow along. This demo will use the default WordPress theme Twenty Twenty-One as an example, but the basic steps will apply to any WordPress theme.
In general, you only need two files to create a basic child theme:
- style.css
- functions.php
In this section, we’ll show you how to create a child theme in WordPress manually. However, if you want to save some time, there are also some tools/strategies to automate the process. We’ll share those in the next section.
Even if you do use one of those other methods, reading over the manual method is still helpful because it will help you better understand how child themes work.
Step 1: Create a child theme folder.
First, you’ll want to create a folder where you can place all the template files and assets of your child theme.
For now, you can create this folder on your local computer. Later in this tutorial, you’ll learn how to install the child theme on your site by adding the files to a Zip folder and installing them via your WordPress dashboard.
Name this folder using the parent theme’s folder name and add “-child” to the end. So if you were creating a child theme of Twenty Twenty-One, you’d name the folder “twentytwentyone-child.”
Step 2: Create a stylesheet for your child theme.
Next, you’ll need to create the “style.css” file inside of your child theme folder, which will contain all of the CSS rules and declarations for your child theme.
This file is also what you use to tell WordPress which parent theme to use, so it’s quite important.
To create the file, you can use any basic text editor (e.g., Notepad) or your favorite code editor (e.g., Sublime Text).
Most importantly, you’ll have to add a required header comment at the very top of the file in order for the stylesheet to actually work.
This comment contains basic info about the child theme, including that it is a child theme with a particular parent theme.
You really only need to include two elements:
- Theme Name. This is the name of your child theme. It could be the name of your site or just something like “[theme name] Child.” For our example, we’ll make it “HubSpot Twenty Twenty-One.”
- Template. This is the name of the directory that contains your parent theme. It’s a big part of what links the child theme with the parent theme. For the Twenty Twenty-One theme, this is “twentytwentyone.” For other themes, it will typically be the theme name, but you might want to double-check. You can do this by looking in the wp-content/themes folder or downloading your theme and opening the Zip file.
Again, the two elements above are 100% required for your child theme to function.
However, you’re free to include other information, including a description, author name, version, and tags. These will affect how your child theme displays in the Appearance > Themes dashboard, and they can also be helpful if you’re going to publish or sell your child theme.
We recommend including a version number, as well, as this will make it easier to enqueue your theme’s stylesheets.
Here’s an example of a complete header comment for a Twenty Twenty-One child theme:


Notice the slashes and asterisks. These signify that this code will be “commented out” in CSS, so WordPress doesn’t try to execute it.
You can add custom CSS later when you’re ready to begin customizing your child theme.
For now, click Save so this stylesheet will be saved in your child theme’s directory.
Step 3: Enqueue the parent and child themes’ stylesheets.
Now it’s time to enqueue your parent and child themes’ stylesheets. This will ensure two things:
- That the child theme inherits its parent theme’s styling. So, when you activate your child theme, you’re not just looking at a bunch of unstyled text.
- That the child theme’s stylesheet is loaded before the parent theme’s — without overriding it. That way, once you add custom CSS and otherwise modify your child theme, these modifications will augment or replace certain styles and functions of the parent theme.
Unfortunately, this step can be a little trickier because the code that you need to use will depend in part on how your parent theme is coded.
For most themes, you should be able to use this code:


However, if this code isn’t working, your theme might be coded differently, or it might not be following WordPress code conventions. In that case, you can consult the WordPress Codex or try one of the other methods that we’ll share later in this post.
Step 4: Install and activate your child theme.
Once you’ve created the two needed files — “style.css” and “functions.php” — you have everything that you need for a basic child theme.

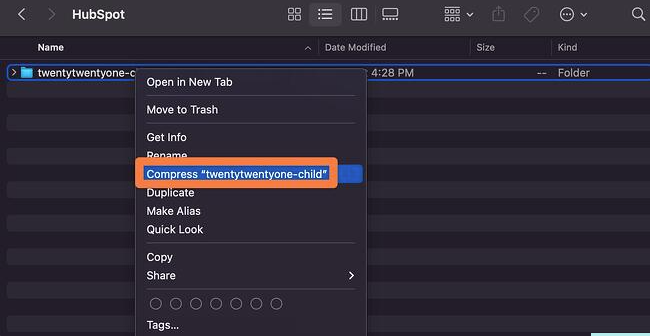
To package the child theme into a file that you can install via your WordPress dashboard, you need to compress the child theme folder as a Zip file.
On both Windows and macOS, you should be able to do this by right-clicking on the folder on your local computer and selecting the option to compress as a Zip file.
Here’s what that looks like on macOS.

Now, you can install this Zip file just like you would any other WordPress theme.
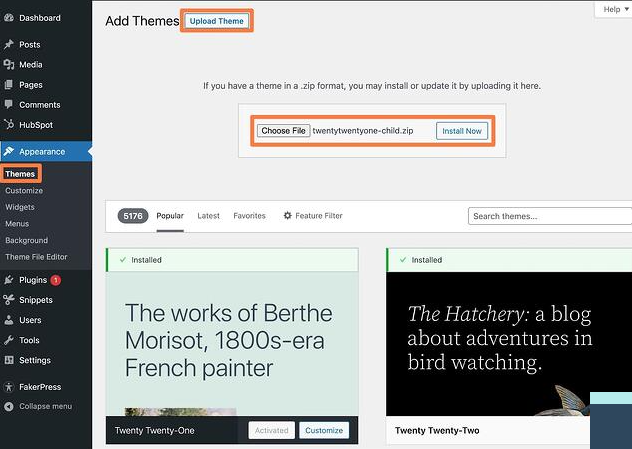
To upload the file, go to your WordPress dashboard and click on Appearance > Themes > Upload Theme. Then, use the file picker to select the Zip file that you just created and click Install Now.

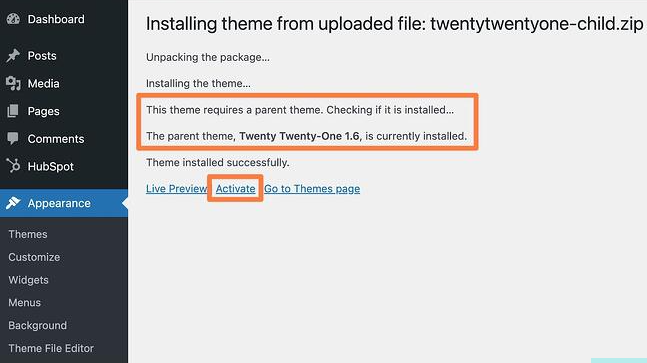
Once you upload it, you should see a message from WordPress telling you that it requires a parent theme and confirming that the parent theme is installed.
If everything looks good, click the Activate button.

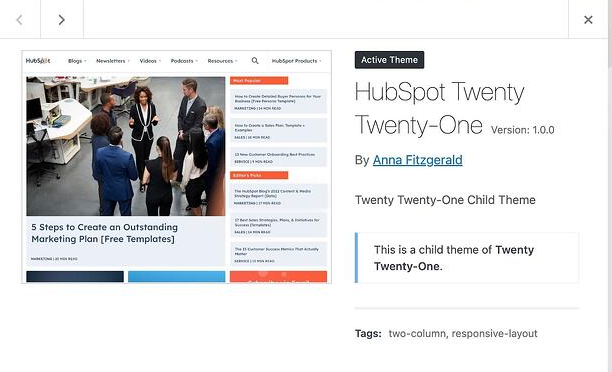
Your child theme is now live! You should see the correct details when you open the theme in your dashboard.
